Summary Shane Olson, a ZBrush guru for his invaluable years at Disney has transitioned into a full-time online instructor, specializing’┐Į Read More Former Disney Character Artist Adopts Reallusion’┐Įs New Character Creator Toon Base ???? Former Disney Character Artist Adopts...

Summary
Shane Olson, a ZBrush guru for his invaluable years at Disney has transitioned into a full-time online instructor, specializing in teaching the creation of stylized characters through his dedicated course. Shane has sculpted a myriad of characters during his live streams, often focusing on detailed busts due to time constraints. Despite the challenge of rigging characters or adding bodies and clothes, a recent discovery with Character Creator integrated with ZBrush has captivated Shane. With Character Creator’┐Įs latest Toon Base and ZBrush Pose Link Plugin, ZBrush artists can give their sculpted stylized characters a fully animatable body and facial rig, and effortlessly bring them to the game engine or 3D printing.
Shane Olson

Hi there, my name is Shane Olson, and I’┐Įve been in the video game and toy industry for over twenty-five years. Ten of those years were spent at Disney, and I am the Lead Character Artist for the renowned Disney Infinity Game Franchise. After I left Disney, I decided to pass down my ZBrush knowledge to more users, and I formed an online ZBrush course called 3D Character Workshop. The course has been a running success and now I am also moving myself to a private ZBrush training course.
I’┐Įve also worked at studios like Sony, Acclaim, and a few others. I specialize in bringing stylized characters from 2D concepts to life in 3D. I also do Live Streams on the Pixologic YouTube channel every Monday at 11 AM Pacific.
Why I chose Reallusion Character Creator for my new workflow
Many of the characters that I have done in the past were posed using ZBrush. While I’┐Įve achieved success after investing considerable time, and effort, and overcoming frustrations, there’┐Įs now an impressive third-party software available to help with this task: Character Creator 4. I recently stumbled upon it, and its capabilities blew me away. Had Character Creator been available during my time working on projects like Disney Infinity, I would have undoubtedly used it instead of the original workflow.
Just to clarify, creating a character from scratch in ZBrush is feasible, but it does present challenges when we need to make live demos and animate them for commercialization pitches. I will demonstrate how you can seamlessly leverage the CC Toon Base from Character Creator, using GoZ to map your ZBrush projects, and then reintegrate them back to Character Creator for detailed customization. Furthermore, you can save this character for future use, making the entire process much more efficient.
How I did it with my Character Creator Project: A Stylized Girl
To test Character Creator, I wanted to take one of the busts I typically do during my live streams, give them a body, and a rig, and make it move in record time. With Character Creator, this is very easy to do. It feels like cheating. It’┐Įs so exhilarating to see your creations come to life. Usually, it takes a lot of time to get to the point of animation, but with Character Creator, you can have your character moving in hours, not days.
Steps with Key Visuals in ZBrush and Character Creator
CC Base Intro, prepping GoZ
I started with a bust of a female head that I created during one of my ZBrush Live streams. The concept was designed by the highly skilled concept artist, Joshua Black. The regular base model in Character Creator is quite realistic, so I worked closely with the Reallusion team to create a new Stylized Toon Base Model. This Toon Base is now available, and you can access the forum page and download it to your Character Creator.

Use Shane’┐Įs Ruler for scaling
To help with the scene scale between Character Creator and ZBrush we can use a ruler that I made a while back while working on Disney Infinity. The ruler is metric, so you can use it for a variety of measurements. In this case, we want it to represent Meters since the CC4 world scale is in Meters. You can get this ruler for free from my website www.3dcharacterworkshop.com

Before we get started, we will need to install two free plugins. You can get these from the Reallusion Hub. Open up Character Creator and make sure you have the Pose Link Plugin installed. Next, after both plugins are installed, open up my ruler project file (or a file with the ruler in it) in ZBrush. My female head already had the ruler in it, with the head scaled to the ruler (don’┐Įt ever scale the ruler).
Select the ruler SubTool, then, over in the Pose Tools Plugin, change the height to 200. This tells ZBrush that the height of the ruler is 200 cm, which is 2 meters. Then press the Resize button. The dialog box should ask you to change the size to 200. If it doesn’┐Įt, hit cancel, select the ruler, and try again. Sometimes it will select a different subtool. After the scene is resized, you can check it by going to Tool>Export>Scale. It should now say 100. Before bringing in our base mesh from Character Creator, we need to do two things with GoZ. First, we need to select the ’┐ĮImport As Subtool’┐Į button. This is very important because we want to add the base mesh to our current Tool.’┐Į
Start GoZ and send data
Next, we want to press the Clear cache files button to clear out any data. Now, over in Character Creator, we can load in our Stylized base mesh. If you so choose, you can select the Eyelash checkbox which will separate the lashes into a separate subtool in ZBrush which will allow you to edit it a bit easier. Just remember that you have to remember to select that box every time you go back and forth.’┐Į
NOTE: Since we set our scene scale over in ZBrush, you don’┐Įt have to check the Match Model Scale box.’┐ĮThen hit GoZ. The Neutral Base should be sent over to ZBrush, and appended into your current Tool It should look like this.’┐ĮIf you need to scale your character or the Base mesh, you can use the Transpose All Selected Subtools option on the Gizmo. Then using Shift + Ctrl you can select the subtools you want to move and scale.


Map the characters (head and body)
After our reference mesh is in place, adjust all of the SubTools of the neutral Toon Base mesh to match. I usually start by adjusting the head first. We can use a wonderful plugin to speed up this process called HeadShot 2 Plugin, but if we don’┐Įt have the plugin, we can move it by hand. Then when we are all done, we can selectively mask and project areas to get a closer match. We can also take some time to adust and re-sculpt the proportions of the body at this time. We can also add subdivision levels to the meshes and paint them with PolyPaint. Later on, we can export the polypaint out as textures and apply them over in CC4.


Adjusting Facials (eyes, eyelashes)
When the head is complete, we may now move the eyes, lashes, brows, teeth, and tongue to match your reference. You don’┐Įt have to match the eye occlusion or tearline. Those will be re-adjusted automatically when you send the mesh back to CC4. The eyeballs are essential, and you will need to nudge this all into place to match your mesh underneath. it’┐Įs intuitive, and it doesn’┐Įt take that long to complete when you turn on the symmetry button and align the eyes. Vice versa, the same method also applies to the eyelashes. A tip for you is to use 3D mouse and it will be faster. After this process is complete, the character will look like this.

GoZ back to Character Creator
This is where the magic happens! Once everything is matched and adjusted how we like it, we can send the neutral base mesh back to CC4 by hitting GoZ Visible inside ZBrush. I recommend hiding everything except for the base pieces that start with Character Creator. I like to get the base body working first. If we have clothing and accessories, we can send them over later.


This is the beauty of Character Creator: this is fully rigged it’┐Įs it’┐Įs got UVs and got skin weight, and it has a whole bone system. This base mesh is built on full-body FK/ IK rig, so you get the benefit of using that rig in other software, such as pushing this to Unreal, Unity, Blender, or Maya. It’┐Įs really smart!

Skin Weighting tools
While we are sending the character data, some objects may not adopt good skin weighting. In this case, the skirt wasn’┐Įt weighted well. We can go in and adjust the weights so it behaves better. Simply click the Attributes>Skin Weights button. We will now see a skeleton which will let us know that you are in skin-weight mode. Click the skirt and click on ’┐Įmodify attributes’┐Į, and there’┐Įs the skin weights tab just click on that and this is a lot like doing skin weights, you’┐Įll see there are these twist bones and these leg bones.
If you right-click on a Twist bone you should see it show up in the weighting. If you right-click on the bone, you can see it’┐Įs like has skin weighting, and you can also select the bones, and you can use the paint brushes and then just do some paint weights, or just the strength.


Baking Textures in ZBrush to import into CC4
To get the textures out of ZBrush, select the object in ZBrush that you want to export the materials from. Character Creators base mesh comes with UDIM, and they’┐Įre just like a bunch of different UV Maps, so its multiple UV sets are what it uses. Select the texture from poly paint right here, click on Create All Maps, and remember where you saved it and we’┐Įll go back to character creator. When you push your character from ZBrush to CC4, it will take on the original texture that was on the Base Toon Avatar. The Base Mesh already has UVs so all you need to do is generate the textures from the Polypaint in ZBrush, then load them into CC4.’┐Į


Applying Content Library
Another beautiful thing about Character Creator is that it comes with a library of assets. Like clothes, shoes, and all sorts of things that you can just drag and drop onto your character. You can also purchase even more content from Reallusion’┐Įs Content Store! I chose to add some red high-heeled shoes to my character. If you use the base mesh Avatar from Character Creator, then you can utilize all of those assets. Though most of them are realistic character assets, that’┐Įs okay. You can load them you can push them over to ZBrush make them stylized, change the textures, and then send them back to CC and use them on your CC characters.

Post editing: Facial adjusting in CC4
This section is about fine-tuning your characters. You can very easily apply animation to preview and check your facial and body rig. You can also adjust the materials and make her lips more glossy, by going into the roughness map and and painting in the roughness so her lips and eyeballs are shiny.

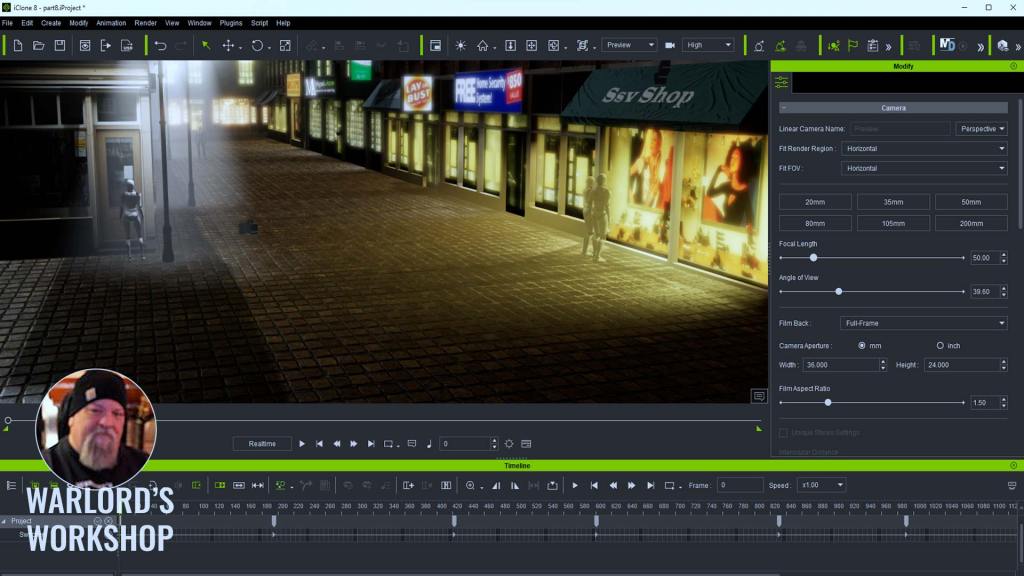
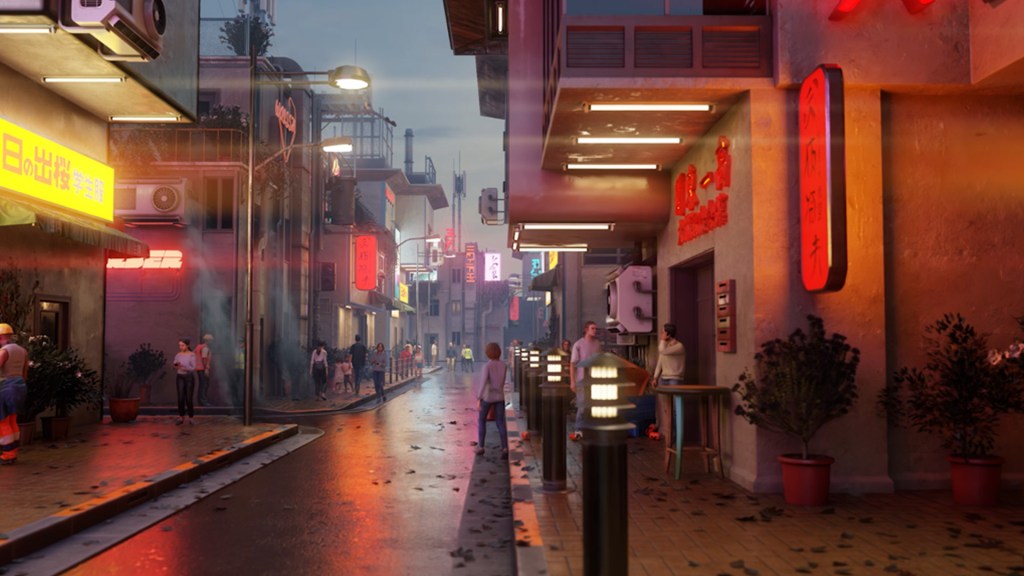
Light Settings
There are also lights that you can add. What is really nice about this, is it’┐Įs a realtime PBR renderer. You can render them and adjust the lights, and the subsurface scattering. To modify them, go to the Scene Tab, select the lights section, and you find a bunch of customization buttons to adjust the settings. These include the colors, light direction, rim light, shadows, and more. You can also add more than one light on the character and mix them up to make your character even pop out.

Final Thoughts
I LOVE this workflow. After doing a few characters this way I want to go through and do this same thing to a whole bunch of my characters. It’┐Įs such a joy to give your characters an actual full body with full rigging including facial movements. Once you get to that point, you’┐Įre hooked. Then the next phase is to add a nice environment and some nice lights. Then you can start to look into other plugins like Face Tools, that allow you to hand-sculpt the facial morphs. You can also look into adding more motions with iClone or driving the character’┐Įs face with your face using AccuFace. It’┐Įs So much fun!!
Learn More
Make ZBrush Character Poses Page
Shane Olson’┐Įs 3D Character Workshop Page
???? Former Disney Character Artist Adopts Reallusion’┐Įs New Character Creator Toon Base ????? Reallusion Magazine?