Follow(function(d, s, id) {var js, fjs = d.getElementsByTagName(s)[0];if (d.getElementById(id)) return;js = d.createElement(s);js.id = id;js.src = "https://www.bloglovin.com/widget/js/loader.js?v=1";fjs.parentNode.insertBefore(js, fjs);}(document, "script", "bloglovin-sdk"))*This post contains affiliate links. I receive small commissions for purchases made through these links at no extra cost to you.�These...

*This post contains affiliate links. I receive small commissions for purchases made through these links at no extra cost to you.�These commissions help me keep this site up and running, in order for me to keep providing helpful and inspiring art content. :)
What is masking fluid, exactly? What can it be used for when painting with watercolor? How do you avoid damaging your paper and other accidents when bringing masking fluid into the watercolor painting process?�
Though masking fluid is not�necessary for beautiful watercolor paintings, it is a great�tool to learn about and start exploring when you're looking to take your skills to the next level.
Masking fluid (otherwise known as liquid frisket) is, essentially, liquid latex.�
It's placed on paper in liquid state and dries quickly, creating a "film" that will keep areas of your watercolor paper protected so that you can go about freely painting over them.
This is important because, when painting with watercolor, the white paper stands in place for our highlights and helps us create light value areas.
?
*No white paint is necessary as we're using the medium's translucency, in combination with the white paper underneath, to develop our different values/tones.*
If we don't plan for highlights or light value areas, our paintings are going to lack dimension and that "glow" that is so particular to watercolor.�
If we don't find ways to integrate the paper as part of the painting, we'll likely end up with a piece that looks flat, heavy, and even overworked.�
Yes, we can plan for highlight shapes and simply work around them without using masking fluid, but in some cases, this can be very challenging and it can feel like walking on eggshells.
Especially because, once we've painted our paper, there's no going back to the whiteness the paper once had.�
?
?
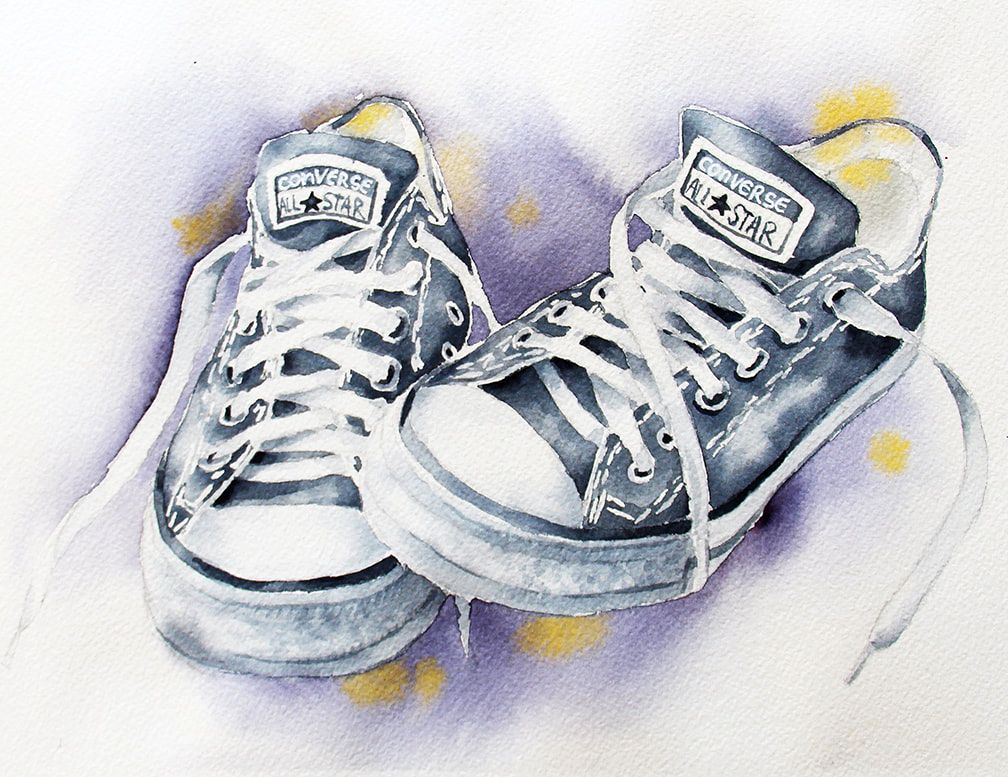
Masking fluid was used here to keep metal rings and white seems, and other light shapes protected throughout the painting process. It was placed with a paintbrush and toothpicks.
*This real-time, fully-narrated watercolor tutorial�is available on Patreon.*
?
Aside from using masking fluid to protect highlight areas, it can be used to create textures and interesting effects.�
You can place it on paper using different tools such as paintbrushes, pens, an old toothbrush, toothpicks, etc., depending on your objectives and the effects you're after.�
??
?
Aside from using masking fluid to protect highlight areas, it can be used to create textures and interesting effects.�
You can place it on paper using different tools such as paintbrushes, pens, an old toothbrush, toothpicks, etc., depending on your objectives and the effects you're after.�
??
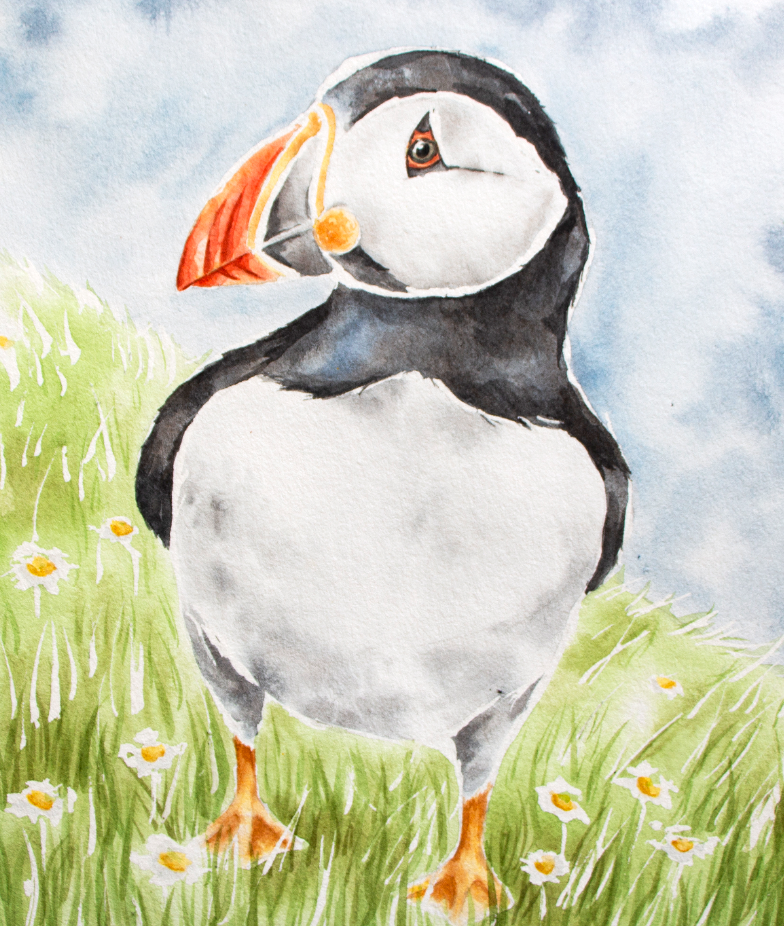
Masking fluid was used here to block out white flowers and to create grass texture. It was placed with toothpicks.
Because masking fluid is liquid latex, it's important to work in a well-ventilated area.
?
It's also important to take precautions if you'll be using paintbrushes.�
I'd�never�recommend using your favorite watercolor brushes to place masking fluid, as it can very easily damage your paintbrush bristles.�
While there are certain things you can do to protect your paintbrush bristles such as coating them with dishwashing soap or liquid hand soap before dipping them into masking fluid, they'll still get damaged them over time.�
?
The 10 must-know masking fluid tips shared in the video below will help you use masking fluid more effectively and avoid undesired accidents.�
??
?
If you enjoyed this video and found it helpful, make sure to subscribe to�my YouTube channel.�I share a brand new video every week with art tips, drawing and painting tutorials and mindset/productivity tips for artists.�*Subscribe HERE*
?
?
Using Masking Fluid With Watercolor- 5 Best Tips
?
1. Go in with a strategy and make time for practice whenever needed
?Before placing your masking fluid, set specific objectives you have for it.�
For example:Will you be using your masking fluid to block out highlight areas?Will you be using it to describe a specific kind of texture (wood, grass, etc.)?
I'd recommend writing down the phases/steps that you're thinking of going through in order to arrive at your desired outcome.
Decide at what point in the process you'll be removing your masking fluid.
*As an FYI: I tend to remove my masking fluid when I'm around 70%-80% of the way through the painting process.�
Finally, would it be helpful for you to practice laying down thin lines, marks or shapes with your masking fluid placement tool on a scrap piece of paper�before�applying it on your final piece?
*If you've never used the tool before, the answer should always be 'yes'!
?
?2. Explore different tools for placing your masking fluid
Don't close yourself off and use only one single tool for masking fluid placement!
Explore and experiment with different "alternative" tools that'll help you create different effects, such as toothpicks for thin/tapered lines or an old toothbrush for splattering effects.�
I�only�use brushes when I have to fill in medium to large shapes or areas.�
I love bringing in toothpicks to create grass textures in landscapes or scenes, and doing splattering with old brushes with stiff bristles for interesting textures.
Different tools will create very different effects, and exploring will open up your horizons to help you arrive at unique results.�
?
3. When using paintbrushes, protect them!
As a rule of thumb, I�never�use watercolor brushes I like and use for painting, to place my masking fluid.�
This is because masking fluid can very quickly damage those bristles and leave paintbrushes completely unusable.�
Not only does masking fluid dry fast and hard on paintbrush bristles, but it's impossible to remove after it has dried.�
Whenever you do need to bring in a paintbrush for masking fluid placement, I'd recommend using older/cheaper brushes that you don't care for much.
I's also suggest protecting its bristles by coating them with soap (liquid hand soap, dishwashing soap or bar soap all work),�before�dipping your paintbrush in masking fluid.�
4. Mind your paper
Using masking fluid on cheap or thin paper is a�huge�no-no because it's highly likely that you'll damage it when it is removed.�
If you're going to be bringing in masking fluid, you want to make sure that you're using quality paper that can tolerate this kind of technique, such as�this one from Arches�or�this one from Canson.��
I always make sure to use watercolor paper that's at least 140 lbs/300 gsm in thickness or weight, as well as 100% cotton.
If I'm trying out new paper, I make sure to do some tests before applying masking fluid on my final piece.�
5. Allow things to dry
When you're using masking fluid for watercolor painting, make sure that you:
a) Place your masking fluid on dry paper.�Unless you're really going for more explorational techniques which you've tried out�before�working on your final piece.�
b) Allow it to dry�completely�before painting over it.�If you're using colorless masking fluid, it should look yellowish and transparent, and no longer opaque white. When dry, it feels tacky but no longer sticky to the touch.�
c)�Make sure your painting is�completely�dry before you remove it.�I wouldn't recommend using a hair dryer or other tool to speed up the drying process when masking fluid has been placed on paper as the heat can make the fluid adhere more strongly.
*How long masking fluid takes to dry will depend on how thinly or thickly its been placed on paper, as well as the temperature and humidity of the environment you're working in. It can take anywhere from 5 minutes to 30 minutes to dry.�
*You can use clean, dry hands to gently rub off your masking fluid, or�a rubber cement pick up.�
6. Soften edges or making masked out shapes smaller whenever needed
If, after having removed your masking fluid, you feel that you've been left with stark white shapes that are too large, you can always soften edges or make those shapes smaller.�
Soften edges by going over them with�*gentle*�scrubbing using a clean, slightly damp brush. I make sure to do this very gently and only 2-3 times max over the same area in order not to damage my paper.�
You can also paint inside the shapes to make them smaller. When I do this, I make sure to go in with watered down/pale color and build up from there if needed.�
??

Check out my FREE Patreon-exclusive tutorial and class samples�here.
?
7. Don't shake your bottle!
Shaking your bottle creates air bubbles, which can make it more difficult to place your masking fluid on paper effectively.�
Air bubbles can lead to undesired textures and effects, as the masking fluid is not placed evenly on your paper.�
If you need to add in a bit of water to slightly modify your masking fluid's consistency (more on this in the next point), use a stick or tool to gently/slowly stir them together to create a homogenous mixture.�
8. You can add a bit of water to change the consistency
Over time and as air enters your masking fluid bottle, it's likely that its consistency will change and become thicker.�
You can add a bit of water to it to change its consistency if you're finding it difficult to place on paper, but�make sure that you don't add too much!
Adding too much water will change the fluid's resistant properties and it won't be able to do it's work.
I'd recommend adding a drop of water at a time, mixing it in gently, and adding just a couple more if needed. You�can use a pipette for this.�
?
?
9. Make sure you're closing your masking fluid bottle tight
When you're done, close your bottle as tightly as possible and store it in a cool, dry place.�
If air is able to get into the bottle, your masking fluid will thicken way faster and become unusable.�
?10. Don't leave masking fluid on your paper for too long
Because masking fluid can adhere more strongly to paper over time, be careful not to leave it on too long.
If you leave it on too long or pull it off too quickly, your paper can get damaged/torn.� I've never had any problems with Arches paper, even after leaving it on for over two weeks, but other papers are more prone to tearing.�
How long you're able to leave your masking fluid on watercolor paper is going to vary depending on the quality of the paper, its thickness, and the environment it's stored in.�
As a rule of thumb, now-a-days, I try to not leave it on my paper for more than a week.�
?
?
7. Don't shake your bottle!
Shaking your bottle creates air bubbles, which can make it more difficult to place your masking fluid on paper effectively.�
Air bubbles can lead to undesired textures and effects, as the masking fluid is not placed evenly on your paper.�
If you need to add in a bit of water to slightly modify your masking fluid's consistency (more on this in the next point), use a stick or tool to gently/slowly stir them together to create a homogenous mixture.�
8. You can add a bit of water to change the consistency
Over time and as air enters your masking fluid bottle, it's likely that its consistency will change and become thicker.�
You can add a bit of water to it to change its consistency if you're finding it difficult to place on paper, but�make sure that you don't add too much!
Adding too much water will change the fluid's resistant properties and it won't be able to do it's work.
I'd recommend adding a drop of water at a time, mixing it in gently, and adding just a couple more if needed. You�can use a pipette for this.�
?
?
9. Make sure you're closing your masking fluid bottle tight
When you're done, close your bottle as tightly as possible and store it in a cool, dry place.�
If air is able to get into the bottle, your masking fluid will thicken way faster and become unusable.�
?10. Don't leave masking fluid on your paper for too long
Because masking fluid can adhere more strongly to paper over time, be careful not to leave it on too long.
If you leave it on too long or pull it off too quickly, your paper can get damaged/torn.� I've never had any problems with Arches paper, even after leaving it on for over two weeks, but other papers are more prone to tearing.�
How long you're able to leave your masking fluid on watercolor paper is going to vary depending on the quality of the paper, its thickness, and the environment it's stored in.�
As a rule of thumb, now-a-days, I try to not leave it on my paper for more than a week.�
?
Recommended supplies:
?
?  Daniel Smith Watercolor Tubes |
Hope this one was helpful.
?If you have any other masking fluid tips of your own to share, or any questions, feel free to leave them below.�
Enjoy your art practice!�
?