Welcome, fellow artists, to a blazing journey where the canvas transforms into a dance of vibrant flames on the velvety stage of black paper! Ever wondered how to wield the magic of colored pencils to create mesmerizing, transparent flames...
Welcome, fellow artists, to a blazing journey where the canvas transforms into a dance of vibrant flames on the velvety stage of black paper! Ever wondered how to wield the magic of colored pencils to create mesmerizing, transparent flames that seem to flicker and dance before your eyes?
Well, you�re in for a treat! In this artistic adventure, we�ll unravel the secrets of drawing flames that leap off the page, as we explore the captivating world of colored pencils on black paper. Get ready to embrace each stroke, unlock the alchemy of layering and blending, and watch your flames come alive in ways you never thought possible.
Buckle up for a whirlwind of creativity, where every stroke is a step closer to unlocking the hidden potential of colored pencils. Whether you�re a seasoned artist or just starting your creative journey, this blog is your ticket to mastering the art of flame drawing. Let�s dive into the vibrant world of colors, shadows, and the subtle dance between light and darkness. Get ready to ignite your creativity!
Colored Pencils and Black Paper Demystified!
Before we dive into the step-by-step creation of radiant flames, let�s address some burning questions you may have about using colored pencils on black paper.
Can you use colored pencils on black paper?
Absolutely! Colored pencils on black paper create a striking contrast that enhances the vibrancy of your artwork.
What kind of pencil do you use for black paper?
A standard number two pencil is perfect for sketching out your initial shapes on the dark canvas. Additionally, white-colored pencils work wonders for highlights.
What color will show up on black paper?
Colored pencils, especially those with rich pigments like Prismacolors, offer a vivid display on black paper. The darker tones complement the background, creating a stunning effect.
Do white pencils work on black paper?
Yes, indeed! White-colored pencils are your secret weapon for adding highlights and luminosity to your artwork on black paper.
What paper is best for colored pencils?
Choosing high-quality black paper ensures a dramatic backdrop for your colored pencil work. The paper�s texture can also influence the blending and layering process.
Can I draw on black paper?
Absolutely! Black paper provides an intriguing canvas that opens up a world of creative possibilities, especially when paired with colored pencils.
Now that we�ve demystified the essentials, let�s embark on the exciting journey of flame drawing, unraveling each step to create a masterpiece that will set your creative spirit ablaze!
Step 1: Prepare Your Workspace and Gather Materials
Before delving into the artistic process, it�s crucial to establish an environment conducive to creativity. Ensuring you have all the essential materials and organizing your workspace will set the stage for an enjoyable and productive flame drawing experience.
Materials Checklist:
Black Paper: Opt for a high-quality black paper to provide a striking contrast for your flame drawing. The dark background will allow your colored pencil work to shine vibrantly. Regular Number Two Pencil: This familiar tool will be your initial guide, helping you sketch out the basic shapes and layout of your flame on the black paper. White-Colored Pencil (Optional): While optional, a white-colored pencil can be a valuable addition, especially for creating highlights and enhancing the luminosity of your flames against the dark backdrop. Colored Pencils: The heart of this project lies in the use of colored pencils. Whether you choose Prismacolors, Faber-Castell, or any other brand, make sure you have a set of vibrant colors to bring your flames to life. In this tutorial, we�re working with a pack of 24 Prismacolors, but don�t hesitate to explore different brands that suit your preferences.Educational Tip for Teachers: Materials Matter!
Dear teachers, remind your creative squad that the tools they use can make a real difference. A killer set of colored pencils can take their masterpiece to a whole new level. Encourage them to appreciate quality materials � it�s like giving wings to their artistic expression.
Practical Tip for Students: Declutter and Unleash the Magic
Alright, you creative wizard! Before you embark on this flame-drawing adventure, take a quick moment to sort out your workspace. A clutter-free area is like a blank canvas waiting for your magic. Arrange your pencils, lay out that black paper, and make sure everything�s within arm�s reach. A tidy space lets you fully immerse yourself in the creative vibe that�s about to unfold.
So there you have it � our tool lineup and a little secret to make your creative space shine. Now, let�s get those flames blazing on that black canvas!
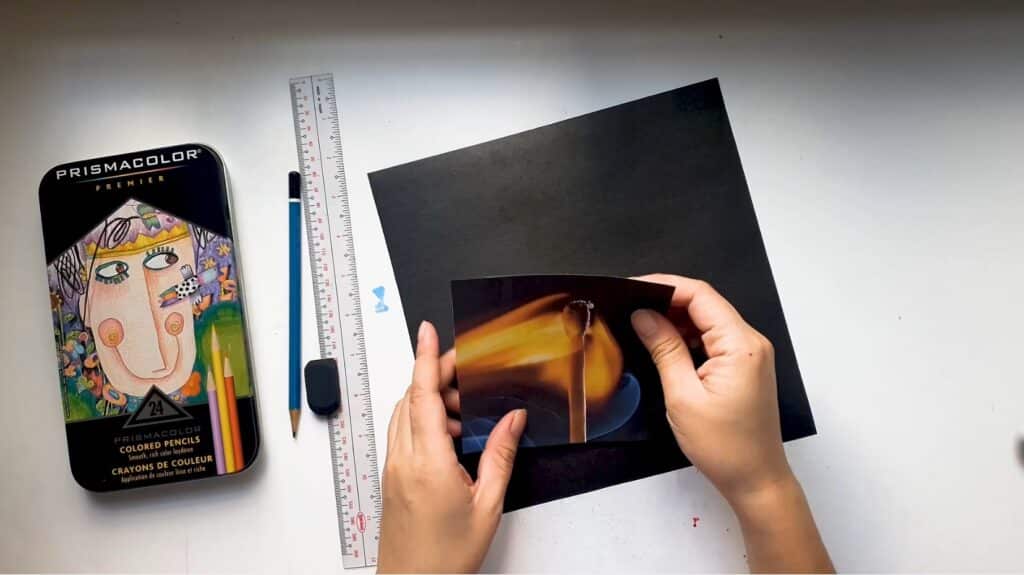
Step 2: Create an X Grid on Your Black Paper
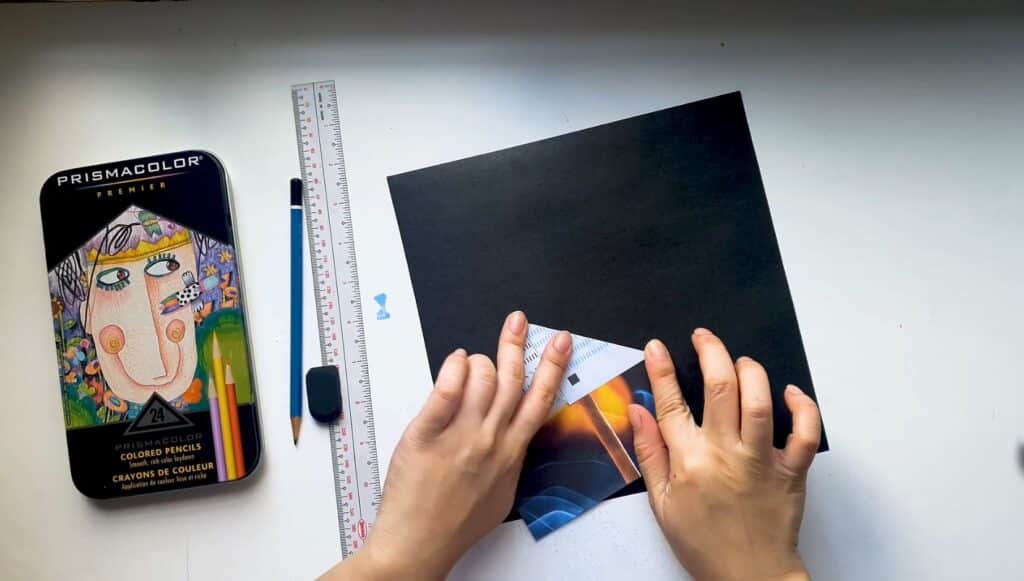
Alright, now let�s talk about getting that subtle guide in place for our awesome flame drawing. We�re going to fold that reference image and create a sneaky X grid. If folding doesn�t tickle your fancy, no worries � you can use a white-colored pencil to draw the grid lightly.
Common Challenge: Navigating the Paper Fold
Now, here�s the real talk � folding that paper can be a bit tricky for some of us. It�s okay; we�re not aiming for origami perfection here. Just take your time, and make sure those folds line up like they�re supposed to. No rush, no pressure.
Educational Tip for Teachers: Precision is the Secret Sauce
Teachers, let�s chat about why precision in these early steps is like the secret sauce to an awesome drawing. A well-folded reference image is like a trusty sidekick, making the drawing process way smoother. Remind your gang that taking a bit of extra time to nail this step sets the stage for an art victory.
Practical Tip for Students: Ruler to the Rescue
If folding feels like a puzzle you didn�t sign up for, grab a ruler and draw a light X with your regular pencil. Easy peasy. It�s all about finding your groove, so go with what feels right for you. This drawing gig is supposed to be fun, not a stress-fest.

So there you have it � setting up our guide with an X grid, making it as stress-free as a Sunday morning. Let�s get that stage ready for our flames!
Step 3: Sketch the Biggest Shapes of Your Image
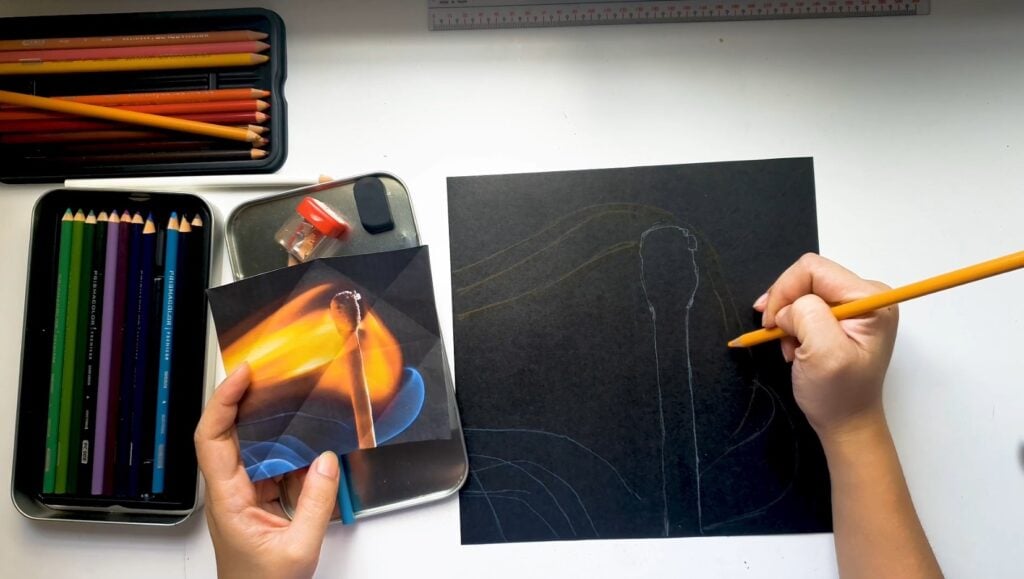
Now that we�ve got our grid helping us out, it�s time to bring those flames to life by sketching out their major shapes. Think of it as laying the groundwork for the fiery spectacle we�re about to create on our black canvas.
Sketching Basics with a Grid Nudge
Start by sketching the main shapes of your flame, using the grid as a handy guide. This step is like giving your flames a skeleton, helping you figure out where everything goes. Remember, go easy on the pencil � light strokes are the way to go. No need to press down hard just yet.
Common Challenge: Wrangling Those Initial Shapes
Now, I get it. Figuring out the first shapes can be a bit tricky. But don�t sweat the small stuff at this point. Focus on the bigger picture, and leave the nitty-gritty details for later. It�s all about setting the stage for the flamey magic.
Educational Tip for Teachers: The Art of Taking a Good Look
As teachers, let�s talk about the power of observation. Break it down for your students � turning complex stuff into simpler shapes is like the secret sauce. Encourage them to really look at their reference images and pick out those basic shapes. It not only makes things easier but also adds a sprinkle of realism to their drawings.
Practical Tip for Students: Slow Down and Explore Your Reference
Take a chill pill and spend some quality time with your reference image. Identify the simple shapes that make up your flame. This isn�t a race, so no need to rush. This initial sketch is laying the groundwork for all the cool details you�ll add later.
So, in a nutshell, we�re sketching out the main vibe of our flames, using the grid as a helpful sidekick. It�s all about keeping it light and easy for now, building up to the dazzling details that�ll make your flames pop on that black canvas.
Step 4: Layering Colors � The Secret to Vibrancy
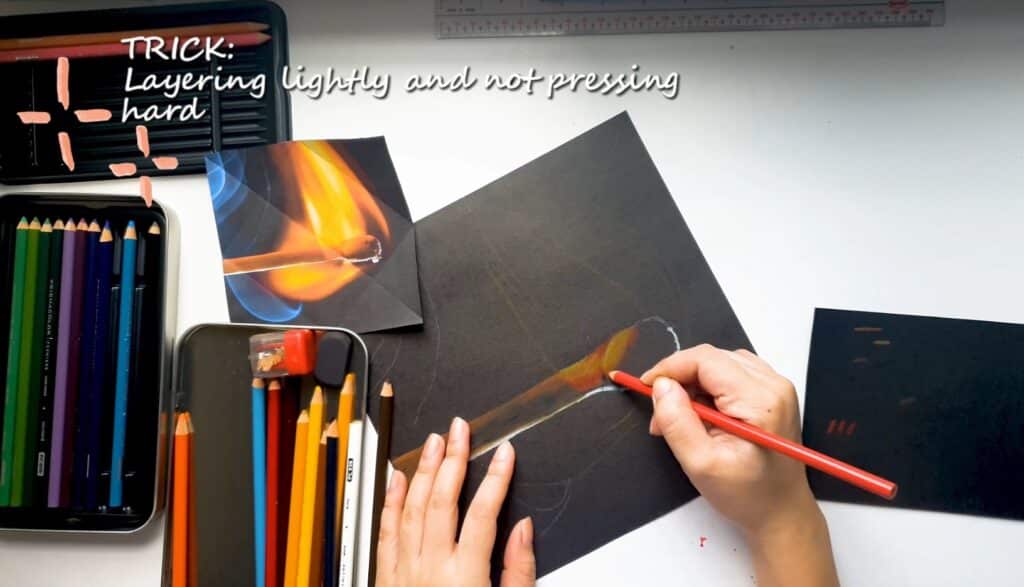
Alright, buckle up, fellow artists, because we�re diving into the juicy part � infusing our flames with color. This step is where the magic truly happens. Get ready to unleash your creativity and watch those flames come to life!
Adding Color with Short, Light Strokes
Grab your colored pencils and start with short, light strokes. Picture it like you�re gently caressing your paper with those vibrant hues. Begin by layering warm tones, slowly building up those highlights. Whether you�re rocking Prismacolors or another brand, the golden rule here is to keep it light. Don�t go Hulk on your pencils � pressing too hard can throw a wrench into our blending party.
Common Challenge: The Heavy-Handed Temptation
Now, I get it. There might be this itch to press down hard for quicker results. But hey, let�s take a collective deep breath and remind ourselves that patience is our secret weapon. Slow and steady wins the race to vibrant, transparent colors.
Educational Tip for Teachers: Dive into Colored Pencil Secrets
Dear teachers, let�s spill the tea on colored pencils. Discuss with your art squad the unique properties these babies bring to the canvas. Dive into the science of layering and how pressure plays a starring role in the final outcome. Arming your students with this knowledge empowers them to boldly experiment and bring their visions to life.
Practical Tip for Students: Warm-Up that Layering Game
Here�s a fun experiment for you, budding artists. Practice layering different combos of warm tones. It�s like a mini color party on the side. See which hues match the vibe of your reference photo. This hands-on exploration not only polishes your skills but also ensures your final creation is as vibrant as your imagination.
So, let�s get those pencils dancing with finesse, layering on the warmth and setting the stage for a flame that�s about to steal the spotlight!.
Step 5: Adding Depth with Shadows and Highlights
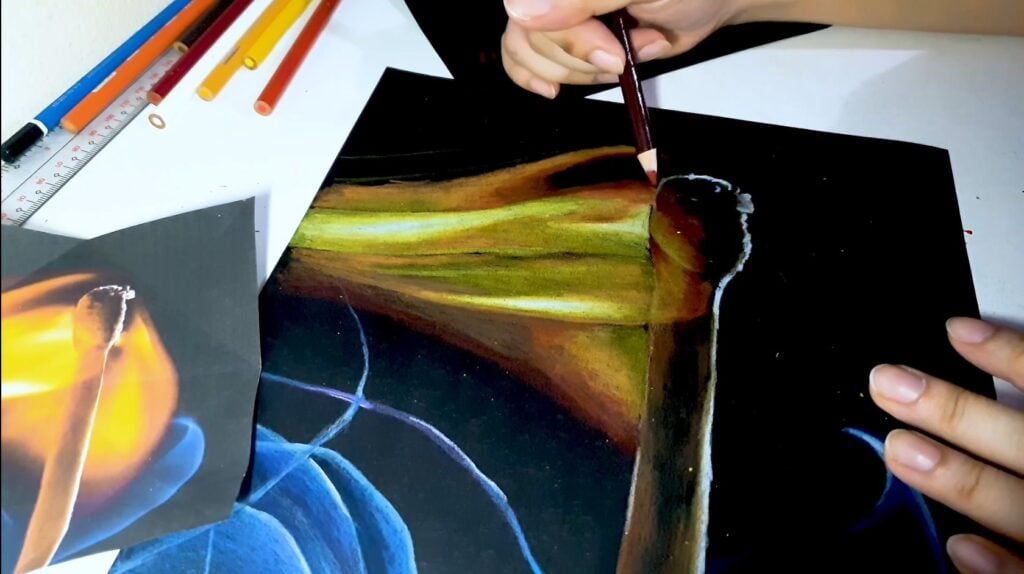
Now, let�s kick it up a notch and add some serious depth to those flames. Think of this step as the secret sauce for making your masterpiece truly pop. We�re diving into the world of shadows and highlights � the dynamic duo that takes your artwork from good to jaw-dropping.
Creating Shadows with Darker Tones
To give your flames that extra oomph, introduce darker tones beneath your main colors. Grab those cool, dark shades and let them dance underneath, especially in areas where shadows naturally linger. It�s like adding a mysterious layer that makes your flames three-dimensional.
Highlights: The White-Colored Pencil Magic
Now, for the magic touch � highlights. Layer a bit of that white-colored pencil beneath your lighter tones to make those flames sparkle. It�s the trick to making your artwork glow against the dark backdrop.
Common Challenge: The Balancing Act of Shadows and Highlights
Okay, let�s address the challenge on the table. Balancing shadows and highlights might feel like walking a tightrope. The key? Encourage yourself to be a keen observer. Dive into that reference image and let it be your guiding light. Understand where nature plays with light and shadow, and let that knowledge shape your masterpiece.
Educational Tip for Teachers: Shedding Light on Light Sources
Teachers, let�s have a mini art-science chat. Discuss the concept of a light source with your students � how it impacts the placement of shadows. Empower them to think critically about the interplay of light and darkness in their artwork. It�s like unlocking a whole new level of artistic understanding.
Practical Tip for Students: Shadow and Highlight Test Drive
Here�s a cool trick for you, budding artists. Before unleashing your shadow and highlight combo on your main drawing, test-drive different color combos on a separate sheet. It�s like a rehearsal for your flames. Experimenting upfront ensures you nail the perfect balance when it�s showtime on your masterpiece.
So, let�s dive into the shadows, play with those highlights, and make those flames dance with depth. This is where the real artistry comes to life!
Step 6: Embrace the Process of Layering and Blending
Alright, dear artists, we�ve reached a crucial juncture � the soulful process of layering and blending. This step is like the heartbeat of your artwork, where patience and finesse bring your flames to a whole new level of beauty.
Building Up Flames with a Gentle Touch
As you dive into building up those flames, remember the golden rule: patience is your best friend. Layer your colors with a gentle touch, using light pressure and short strokes. This isn�t a race; it�s a slow dance where each layer contributes to the stunning transparency of your masterpiece. And here�s a little secret: hold that pencil a bit further back when blending for that feather-light touch.
Common Challenge: The Rushing Temptation
I get it � there might be this urge to speed through this step. But hold on a second! The allure of colored pencil art lies in the meticulous dance of layering and blending. Remind yourself that the beauty unfolds in the details, and each stroke is a brushstroke on your canvas of flames.
Educational Tip for Teachers: Showcasing the Masters of Colored Pencils
Teachers, let�s weave a bit of art history into the mix. Share examples of famous artworks created with colored pencils. Highlight the intricate details achieved by the masters through layering and blending. It�s like a little inspiration boost, showing your art squad what�s possible when you embrace the process.
Practical Tip for Students: Make it a Masterpiece Ritual
Dear artists, enjoy the ride! Put on some calming tunes, take those little breaks, and savor each stroke as your flames come to life. This isn�t just a task; it�s a journey. Soak in the satisfaction of seeing your artwork evolve with each layer. It�s your masterpiece in the making, and you�re the artist orchestrating its magic.
So here�s to patience, to gentle strokes, and to the symphony of colors blending harmoniously. Enjoy the process, maestros of the colored pencil canvas!
Congratulations! You�ve completed a mesmerizing flame drawing using colored pencils on black paper. This project not only enhances your understanding of colors and shading but also allows you to explore the unique qualities of colored pencils. Remember, the key is patience, observation, and a willingness to experiment. So go ahead, ignite your creativity, and let your flames burn brightly on the canvas of black paper!
Did this lesson spark your creative flame?
Imagine what awaits you in my Flame Drawing and Shading Colored Pencil Art Project!
If this blog post has ignited your passion for creative expression, the Flame Drawing and Shading Colored Pencil Art Project will take your artistic journey to unparalleled heights! Picture this: a 5-minute video demonstration guiding you through the intricate process, a treasure trove of 28 reference images for flame drawings, and customizable slideshow presentations � both view-only for quick access and editable for tailored teaching experiences.
But the wonder doesn�t stop there. Imagine having a step-by-step PDF handout, equipped with a QR code for seamless access to the video and presentation. And for educators seeking stress-free assessment, an editable colored pencil drawing rubric is included, ensuring a smooth and enjoyable teaching experience.
Why wait to unlock this world of creative possibilities? By incorporating my complete lesson, you�re not just teaching art; you�re inspiring a journey of artistic self-discovery. Elevate your lessons, capture your students� imaginations, and witness the extraordinary unfold in your classroom. Ready to embark on this transformative adventure?
Be the first to know about discounts, freebies, and new resources!
Find me on my blog ��Inside Out Art Teacher,�YouTube,�or�Instagram.