The post Photography Tips:- The Basics ďż˝ Rule of Thirds, part 2 appeared first on Andrew Barnes Photography.
Another week, another blog post ďż˝ well, If you believe thatďż˝
Anyway! � It�s time to revisit the Rule of Thirds. In this article I discussed the idea that you use a built-in feature on your camera to give you a three-by-three grid. You use that grid to line up your image and put the Important Bits of your photo on.
A History Lesson ďż˝ and why the Rule of Thirds works
Let�s talk a bit more. In fact let�s talk about painting! Specifically Renaissance painters. I must admit I don�t know my Monet from my Money personally, oh hang on, he was impressionist� I digress. These Renaissance painters were clever guys. They worked out (at least) two things.
Firstly, your eyes naturally wander and do not rest in the middle of an image. Let�s call it a painting, as I don�t think there were too many second-hand camera shops around on street corners in Rome at the time. If your eyes rested in the middle of an image to start with, it was thought they would �move on� to somewhere else � like another painting! So it�s all about holding the viewer�s attention. Don�t give your viewer something �too static�. Secondly, if you paint a picture and you move the subject away to one side, you can tell a strong story, or set the details of the scene, in the remaining bit of the blank canvas that is not occupied by The Important Bit.Clever, eh? As landscape photographers, we can do the same.
Now � if you don�t believe me, get yourself off to a cinema, and for once forget about how fast the cars are going, or how strong Our Hero�s jaw line is, or, my my, isn�t Our Heroine just gorgeous (depending on your persuasion, dear reader, of course). Look instead at the initial framing for each new scene. Cinematographers know this stuff backwards � inside out, upside down. As landscape photographers, or panoramic photographers to need to know this stuff too!
Let�s take a look �
Have a look at these two images taken at Berowra Waters. Which do you prefer more? Which did you look at longer? I mean. It�s the same thing � a couple of boats, a bit of colour in the sky, the shape of a cloud, a few trees�. same same, eh?
No.

Here I have placed the horizon pretty much Slap Bang in the middle of the frame. To me, it looks un-natural, and hopefully it does to you, too, even with no further reading. Far too much �nothing� foreground.
ďż˝

Here I have placed the top of the row of trees on the bottom third line of the image. I could have pointed the camera down a little more.
So ďż˝ I hope we all agree the bottom image holds your gaze for longer. The bottom image also uses the corners (or rather the top left corner) as a framing aid. Come back and have another look once you have read the full article!
ďż˝
The Rule of Thirds ďż˝ and how to make it work for you
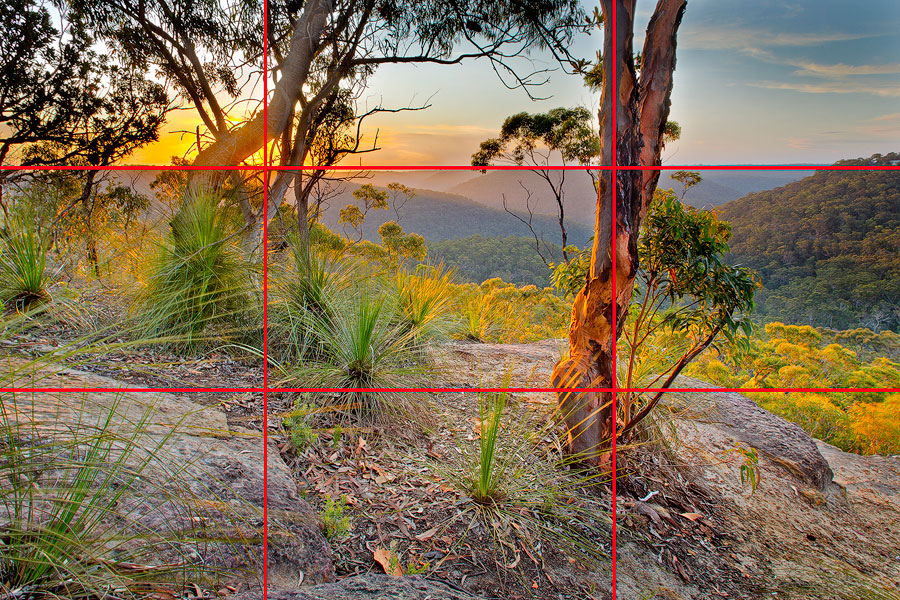
Here�s a flashback to my previous article� the three-by-three, and the use of lines and intersections.

The horizon line is set on one red line, the tree trunk set on another red line.
The sunset is at an intersection.
Classically following the rules.
The main reason of knowing the rules is that when you are presented with Great Light ďż˝ you can, without even thinking ďż˝ frame and press with no delay. Not quite like a Police Marksman with hundreds of hours of training to put the bullet in the right place in that split second but nearly!
ďż˝
The Rule of Thirds ďż˝ Counterpoint
A little advanced theory � it doesn�t always work, and I don�t always use it�
IF you have set your primary subject on one of the intersections, you can set a secondary �interest point� at the intersection diagonally opposite.

�Sublime Light�. Here we have one of the main features (the sun) on an intersection) and another (the water) on the opposite intersection point.
ďż˝

The Path to Naa Badu. I am again using an intersection for the sun ďż˝ and I am also inferring the counterpoint with the lines of the sun. Not quite but nearly!
ďż˝
The Rule of Thirds ďż˝ and how to vary them
So � now you know the Rule of Thirds, I am going to give you some advice and examples on varying them. We all know Rules are there to be broken, just ask any adolescent! I was one once, I know! The thing is � you need to know they are there before you can break them in a good way. If you break them in a bad way � dear dear, let�s not go there. #holidaysnaps #beginnerfail

Cloudaway. Se here we go again. The main image point (the sun) slap in the middle. At the time I felt it was the only place to put the sun. And I still do. What do you think?
Has this made you think? If nothing else, please, once again refer to cinematography when you watch a movie. These guys truly know what they are doing.
ďż˝
ďż˝
Til next Time
Andrew Barnes
The Berowra Photographer
The post Photography Tips:- The Basics ďż˝ Rule of Thirds, part 2 appeared first on Andrew Barnes Photography.


